Connecting lights to a golf cart effectively requires attention to both safety and functionality. A voltage reducer is often essential in this process. According to industry reports, nearly 70% of golf cart owners upgrade their lighting for improved safety and visibility. Understanding how to wire golf cart lights to a voltage reducer is crucial for a successful installation.
Expert technician Kevin Hartley emphasizes, “Proper voltage management can enhance the lifespan of your lights and prevent electrical issues.” His experience demonstrates that many users overlook this essential step. A voltage reducer adjusts the power output, allowing standard 12V lights to function correctly on a typical 36V or 48V golf cart system.
While assembling your setup, remember that improper wiring can lead to problems. Detailed instructions are vital. Many owners find the process intimidating. However, with the right guidance, it becomes manageable. Avoiding common mistakes in the wiring process can significantly improve safety and performance for your golf cart lights.
Golf carts often serve as versatile vehicles in recreational settings. Understanding their lighting systems is crucial for both safety and aesthetics. A golf cart lighting system usually consists of headlights, taillights, and turn signals. These components require a proper power supply for optimal performance.
Typically, golf carts operate on a battery voltage of 36V or 48V. However, many standard lights are designed for 12V systems. This mismatch can lead to dim lights or even damage. A voltage reducer is essential to bridge this gap, allowing your lights to function safely.
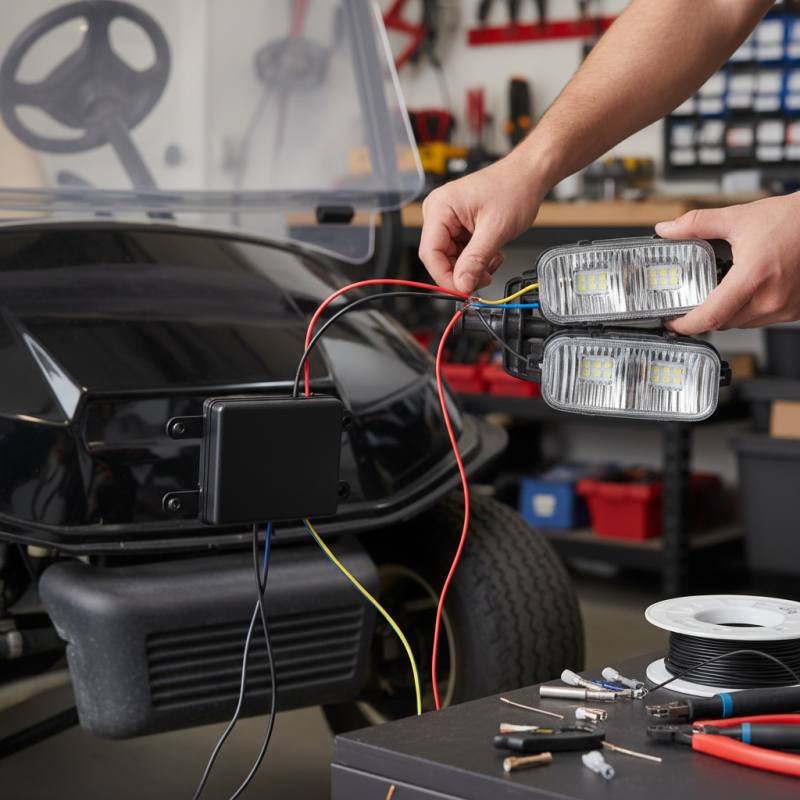
When connecting lights to a voltage reducer, ensure all connections are secure. Check for any potential shorts or loose wires, as they can cause malfunctions. It’s important to be mindful of the gauge of wire used. Using incorrect gauge wiring can lead to overheating. Reflecting on your installation process can help enhance future projects and improve your understanding of electrical systems in golf carts.
Choosing the right voltage reducer for your golf cart is crucial for effective lighting. A good voltage reducer helps protect your lights and battery. It ensures that your cart runs smoothly without draining the battery too quickly. Many golfers overlook this aspect, but it can affect your entire driving experience.
Look for a voltage reducer that matches your golf cart's voltage. Most golf carts run on 36V or 48V systems. A reducer as low as 12V or 5V can provide power for different light types. It’s essential for LED lights. These lights require less energy but may need precise voltage.
Tips: Always check the amperage ratings when selecting a reducer. Underestimating your light's needs can lead to malfunctions. Installing a poorly rated reducer can lead to flickering lights or even damage. Consider the environment where you use your cart. Weather can affect performance, so choose a durable and weather-resistant reducer.
While technical specifications matter, experience counts too. Many users report challenges with incorrect installations. Taking time to read user manuals can save you from headaches later. Connecting your lights with the right voltage reducer should enhance your golf cart’s performance. Missteps can lead to poor lighting or even safety hazards on the course.
Preparing your golf cart for light installation requires attention to detail and careful planning. Start by gathering all necessary tools and materials. You’ll need a voltage reducer, wiring harness, connectors, and safety gear. Ensuring your workspace is clean and organized can make the process smoother.
Next, inspect your golf cart’s electrical system. Check for any existing issues that may affect the installation. A fully charged battery is essential. This prevents complications during the setup. Make sure to wear safety glasses and gloves. Safety should always come first when working with electrical components.
Once you have set up your workspace, consider the location of the lights. Think about visibility and aesthetics. Measuring before cutting any wires can help avoid mistakes. It’s okay to take your time and double-check your work. Rushing may lead to issues later on. Being meticulous in preparation can greatly enhance the final outcome.
Connecting golf cart lights with a voltage reducer can enhance your vehicle's functionality and safety. This process may seem complicated, but it's manageable with a clear guide. Begin by gathering your tools: a voltage reducer, wire strippers, connectors, and a multimeter. Safety is essential, so disconnect the battery before starting.
After ensuring your workspace is safe, identify where the voltage reducer will be installed. Many choose to place it close to the batteries. Strip the wires to connect the voltage reducer, focusing on proper color coding. It’s crucial to attach the wires securely. Insufficient connections can lead to flickering lights or potential hazards. Test your connections using a multimeter, checking for consistent voltage output.
Once everything is connected, reattach the battery and test the lights. Observe how they function under different conditions. If the lights don’t work as expected, revisit your connections. Often, the issue lies in overlooked details. Remember, patience is key. Configuration mistakes can lead to frustrating issues later. Each step, though small, plays a significant role in ensuring your golf cart lights operate flawlessly.
When troubleshooting golf cart lights, understanding the common issues can save time. Dim lights may indicate a weak battery or poor connections. Frequent bulb replacements signify a deeper electrical issue. According to industry data, nearly 30% of golf cart light failures stem from wire deterioration. Regular inspections assist in maintaining light functionality.
Start by checking the voltage reducer. A faulty reducer can lead to inconsistent voltage, affecting light performance. Use a multimeter to measure voltage output. If it fluctuates, replacement may be necessary. Keep an eye on your wiring; frayed or corroded wires also contribute to problems.
**Tips:** Inspect connections regularly. Loose connections can lead to flickering lights. Ensure your battery voltage is sufficient for all electrical components. A drop below 36 volts can cause issues. Remember, not all problems are obvious. Consider professional help when needed.
: A voltage reducer protects lights and the battery. It ensures smooth cart operation without draining the battery quickly.
Choose a reducer that matches your golf cart's voltage. Most carts operate on 36V or 48V systems.
LED lights require less energy but need precise voltage. Ensure the reducer matches the specific voltage needed.
Inspect the electrical system for any issues. A fully charged battery prevents complications during installation.
Measure locations before cutting wires. Double-checking your work can prevent rushing-related issues.
Check for weak batteries, poor connections, or frayed wires. Regular inspections help maintain light functionality.
Use a multimeter to measure the reducer's voltage output. Fluctuations may indicate the need for replacement.
First, check for loose connections. A drop in battery voltage can also cause this issue.
Always wear safety glasses and gloves. Ensuring a safe workspace is essential when handling electrical components.
Not all problems are obvious. If troubleshooting fails, professional assistance may be necessary for safety.
In this guide on "How to wire golf cart lights to a voltage reducer," we start by discussing the essential components of golf cart lighting systems, highlighting the importance of a reliable voltage reducer for safe operation. Choosing the appropriate voltage reducer tailored to your specific golf cart model is crucial to ensure optimal performance and durability.
Next, we cover the preparations needed for installing lights on your golf cart, including necessary tools and safety measures. The step-by-step instructions provide clear guidance for connecting the voltage reducer, making it an accessible process for enthusiasts. Finally, we emphasize the importance of testing and troubleshooting to ensure your new lighting setup functions correctly, allowing you to enjoy nighttime rides with confidence.
Tulip Cart